STEP 1
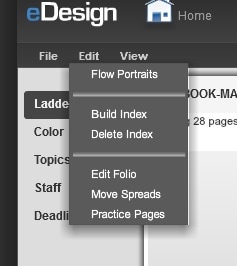
On the left side of the screen when you are in book view on edesign, click edit and then build index.
STEP 2

Once you have this screen, you can start filtering through the entries. When the index gathers index entries, it collects any two words that are next to each other both beginning with capital letters, which means that entries such as Justin Timberlake and Full House flow into the index. Obviously you don't want those names in your index, so you have to delete them.
STEP 3

In order to delete an entry, you have to click on the entry and then click ignore in the top left. Go through the entire list of entries and delete everything that is not a name of a student at the school or a faculty member. The first time that you go through the index, you want to delete all sports, clubs, academics, etc. and only have the names of students and faculty.
STEP 4

The bookmark tab allows you to bookmark entries that you may need to double check on, edit in the future, or you can just bookmark them to know where you stopped going through. The arrows on the side let you go between just the bookmarked entries.
STEP 5

On the left hand side if you click "add" this screen comes up. During the last deadline and when you are flowing the index for the FINAL time (you will probably flow a million times before it is final) you can add entries back for all clubs, sports, and academics. Go through every single page of the book and write down what is on each page (sports and what level and gender, clubs, academics, etc.). Put everything onto a Google doc, and when you are done going through every single page, sort through and put like things together (Varsity Football 13, 73, 95). After doing this and you have a list of it all, you can manually add this list into the index. In order to make sure that the index reflects your theme, if you have lowercase throughout make these entries all lowercase, and if you have uppercase then do that. Ensure that all of the names of students and staff are still in title case.
STEP 6

Once you have ignored, edited, or combined entries you can access them and change them from this tab.
STEP 7

You can click on an entry and click "edit" on the left hand side. The most common use of this will be when club and sports pictures are flowed in. When names are entered and it happens that it says Row 1: Elena Becker, XX, XX it will flow the name as in the picture above. When this happens, the easiest way to do this will be to get a piece of paper and write down every person who this happens to and write down the page they are on. Once this is done, then you can ignore all of these entries. Then, go through the people on the paper and "edit" their entries to include the page number that they are on but make sure that you put it in numerical order and change the usage to accurately reflect the new usage.
STEP 8

The combine feature is not used often, but can be used when you need to combine two entries that are the same or that need to be the same. This usually happens with faculty, as sometimes it flows as Ms. XX XX or Mr. XX XX. In order to do this, you have to select the two names and then click combine on the left. Select which one you want to be viewed as and then the page numbers and everything will be combined into one entry.
STEP 9

Once you have combined or edited entries, a blue or green dot will appear next to their name in this window to make it easier.
STEP 10

Once everything is done, and all once you feel ready to flow the index for practice or for the final time, click next on the bottom and this screen will appear. Whatever you have flowed from the index before will have to be deleted in order to continue. Click yes to continue.
STEP 11

This is the next screen that will appear. The first thing that you will want to do is change the starting page to accurately reflect where you want it to start. After this select 5 columns per page and 0p3 column spacing, as reflected in the picture. Also, as you can see, whatever content you have on the index pages, will stay on the pages and the index content will flow regardless of this content and you can move it around later.
STEP 12

From the next screen, you have the chance to pick what you want for the fonts and sizes of the big letters and of the names. Same as in the book setup, you can add font styles and name them with something. I suggest naming them as something special for the index such as index big letter or index names. Once these are created you can select them for the styles for the index.
sTEP 13

This is the screen discussed in the previous step.
STEP 14

This is the most important step. For each page, you get to decide where the content goes and what columns are free or where there is free space. You can drag down columns from the top to clear a column or create more than one row in the column and clear one so that there is a middle section free for content. If you want a whole column for content then drag a column down or up all the way to clear it. If you want half of a column, then make sure to create two rows and then clear either the top or bottom.
STEP 15

Next, you can click this button to finally flow your index.
STEP 16
Once you have the index in the book and on the pages that you want, you have to go through the whole index multiple times to ensure that there are no names in there that you do not want. I suggest making all of the clubs, academics, and sports, etc. in a bolder font than the rest of the names to break it up a little bit. When you do this, the names will most likely go off of the bottom of the column. Now you have two options. You can pull the column a tiny bit to the side so that it all fits, or you can drag the box up to cover the entry so that it flows into the next column over. When you get to the bottom of a page, you may have to insert and entry from the next page or move something to the next page.
Another tip, make sure that the letters have at least 2 entries under them if they happen at the bottom of the page. If not, then move the letter to the next column and leave the space at the bottom of the column blank.
Another tip, make sure that the letters have at least 2 entries under them if they happen at the bottom of the page. If not, then move the letter to the next column and leave the space at the bottom of the column blank.
